
Comment entretenir une planche à découper en bois : huilage, cirage et tout le reste
Une bonne planche à découper est l'un des outils les plus sollicités de votre cuisine. Bien entretenue, une planche à découper en bois massif peut durer des décennies, voire toute une vie. Négligée, elle peut se déformer, se fissurer, abriter des bactéries et se désintégrer en quelques mois. Ce guide couvre tout ce que vous devez savoir pour garder votre planche propre, conditionnée et sûre pour les années à venir.
Avant de parler d'entretien, il est important de comprendre que différents types de planches à découper nécessitent différents niveaux de maintenance. Plus le matériau est naturel, plus il demande d'attention — et plus les résultats sont gratifiants.
Planches en bois dur d'une seule pièce (érable, noyer, cerisier, teck). Belles et durables, mais très sensibles à l'humidité et au dessèchement. Nécessitent un huilage, un cirage et un lavage soigneux réguliers.
Fabriquées à partir de plus petits morceaux de bois collés ensemble. Plus stables dimensionnellement que les planches massives — moins sujettes à la déformation — mais nécessitent tout de même un huilage régulier et de bonnes habitudes de lavage.
Planches en PEHD ou polyéthylène. Lavables au lave-vaisselle, non poreuses et très résistantes aux dommages causés par l'humidité. Nécessitent un conditionnement minimal mais doivent être remplacées lorsqu'elles sont profondément entaillées.
Une planche en bois massif coupée d'une seule planche est la plus exigeante des trois. Parce qu'il s'agit d'une seule pièce de bois continue, elle absorbe et libère l'humidité dans une seule direction — ce qui la rend beaucoup plus susceptible de se déformer et de se fissurer si elle n'est pas entretenue correctement sur les deux côtés de manière égale.
C'est la règle la plus importante pour l'entretien d'une planche à découper en bois. Le lave-vaisselle détruira une planche à découper en bois — sans exception.
Les lave-vaisselle exposent le bois à de l'eau chaude prolongée, de la vapeur et des cycles de séchage à haute température. Cette combinaison provoque l'expansion et la contraction rapide et inégale des fibres de bois, entraînant déformations, fissures et fendillements. Les détergents fortement alcalins éliminent toute finition à l'huile protectrice.
Les planches synthétiques (plastique) marquées comme lavables au lave-vaisselle sont les seules planches à découper adaptées au lavage en machine.
La bonne technique de lavage fait une différence significative pour la durée de vie de votre planche. Les principes clés sont la rapidité, la température et la sécheresse.

Lavez toujours les planches en bois avec de l'eau froide ou tiède. L'eau chaude fait gonfler les fibres de bois et ouvre le grain, augmentant l'absorption d'humidité et accélérant la déformation.
Une petite quantité de savon à vaisselle doux est parfaitement sûre pour les planches à découper en bois si elle est rincée rapidement. Lavez, rincez immédiatement et séchez.
Ne jamais immerger une planche en bois dans l'eau ou la laisser reposer dans un évier rempli d'eau. Un trempage prolongé sature profondément le bois, provoquant de graves déformations et gonflements.
Après le lavage, séchez immédiatement les deux côtés avec un chiffon propre ou du papier absorbant. Puis, placez la planche verticalement sur le côté pour permettre à l'air de circuler librement sur les deux faces.
Les planches en bois massif sont particulièrement vulnérables au séchage différentiel. Si une face sèche plus vite que l'autre, la planche se courbera vers le côté le plus humide. Ne jamais poser une planche mouillée à plat sur un comptoir.
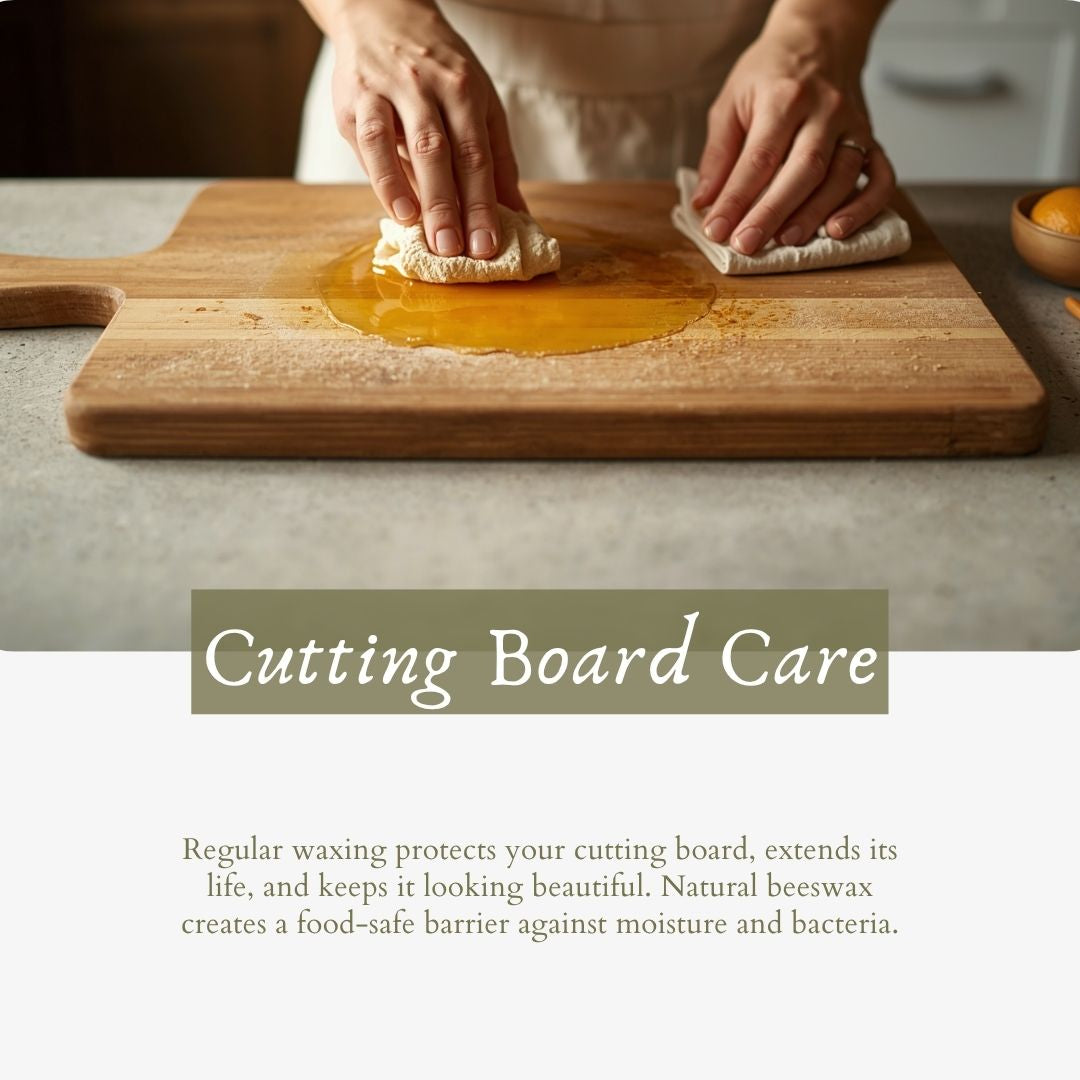
L'huilage est l'étape d'entretien continu la plus importante pour toute planche à découper en bois. L'huile empêche le bois de se dessécher, l'empêche d'absorber trop facilement l'eau et l'empêche de se fissurer et de se fendre.
- Huile minérale de qualité alimentaire (meilleur choix)
- Huile de camélia de qualité alimentaire (stable, inodore)
- Huile de tung pure (entièrement polymérisée)
- Crème pour planche / baume pour bois
- Huile de coco fractionnée (forme stable)
- Huile de noix (si pas d'allergies aux noix)
- Huile d'olive — rancit
- Huile végétale — rancit
- Huile de tournesol — rancit
- Huile de canola — rancit
- Toute huile de cuisson non listée ci-dessus
Les huiles qui ne sont pas stables à température ambiante ranciront à l'intérieur du bois, provoquant une odeur désagréable et potentiellement contaminant les aliments. Utilisez toujours de l'huile minérale de qualité alimentaire ou une huile pour planche spécialement conçue.
1. Assurez-vous que la planche est complètement propre et sèche avant d'huiler.
2. Chauffez très légèrement l'huile minérale — l'huile chaude pénètre plus profondément le bois.
3. Appliquez une quantité généreuse sur toutes les surfaces — les deux faces, les quatre chants et le dessous.
4. Laissez absorber pendant un minimum de 4 à 6 heures, ou idéalement toute la nuit.
5. Essuyez tout excès d'huile non absorbé.
6. Répétez 2 à 3 fois pour un meilleur résultat, surtout sur une nouvelle planche.
Les planches en bois massif nécessitent un huilage sur les six surfaces, y compris le dessous. L'huilage de la seule face supérieure provoque un déséquilibre d'humidité et une déformation. Traitez toujours chaque surface de manière égale.
Après l'huilage, l'application d'une cire ou d'une crème pour planche de qualité alimentaire ajoute une deuxième couche de protection qui scelle l'huile, repousse l'eau et donne à la planche un bel aspect satiné.

Les meilleurs produits de cire pour planches à découper sont les crèmes pour planche à base de cire d'abeille et d'huile minérale de qualité alimentaire. Pour l'étape d'huilage, l'huile de camélia de qualité alimentaire est un excellent choix — prisée dans la culture culinaire japonaise pour sa stabilité et ses propriétés de conditionnement doux sur le bois et l'acier.

Dérivée de la plante de camélia, cette huile de qualité alimentaire est utilisée dans les cuisines japonaises depuis des siècles pour protéger et conditionner les lames d'acier et les surfaces en bois. Très stable, pratiquement inodore et totalement sûre pour les surfaces en contact avec les aliments.
1. Huilez toujours la planche en premier et laissez-la absorber complètement avant d'appliquer la cire.
2. Appliquez une petite quantité de crème pour planche ou de cire d'abeille sur la surface à l'aide d'un chiffon doux.
3. Faites pénétrer la cire dans la surface en effectuant de petits mouvements circulaires, couvrant toutes les faces et les bords.
4. Laissez reposer 20 à 30 minutes pour permettre à la cire de durcir légèrement.
5. Lustrez pour une finition lisse avec un chiffon propre et sec.
Cirez votre planche tous les 1 à 3 mois selon la fréquence d'utilisation — ou chaque fois que la surface commence à paraître terne et que l'eau ne perle plus.
Les planches à découper en bois ont des propriétés antibactériennes naturelles — les bactéries attirées dans le grain du bois ont tendance à mourir plutôt qu'à se multiplier. Cependant, une désinfection appropriée après avoir manipulé de la viande crue, de la volaille ou du poisson reste essentielle.
Vinaigre blanc : Vaporisez ou essuyez du vinaigre blanc non dilué sur la surface de la planche et laissez agir quelques minutes avant de rincer.
Gommage au sel et au citron : Saupoudrez de gros sel sur la planche, utilisez un demi-citron pour frotter la surface. Rincez à l'eau froide et séchez immédiatement.
Peroxyde d'hydrogène à 3 % : Appliquez avec un chiffon, laissez agir quelques minutes, puis rincez abondamment.
L'eau de Javel non diluée asséchera, décolorera et endommagera la surface du bois. Si l'eau de Javel doit être utilisée, diluez-la fortement — pas plus d'une cuillère à soupe par gallon d'eau — rincez abondamment, séchez immédiatement et ré-huilez une fois sèche.
Une planche en bois massif — coupée dans une seule planche continue — est la planche à découper la plus exigeante à entretenir. Tout son grain est orienté dans une seule direction, ce qui la rend plus réactive aux changements d'humidité et de température.
Dans les foyers où le chauffage réduit l'humidité intérieure en hiver, les planches en bois massif peuvent nécessiter un conditionnement plus fréquent — peut-être toutes les deux semaines. Une planche bien conditionnée aura un ton chaud et riche. Une planche qui se dessèche apparaîtra pâle, crayeuse ou grise.
Lorsqu'une planche développe des coupures profondes et des zones rugueuses, elle peut être entièrement restaurée : poncez la surface progressivement avec du papier de verre de grain 80, puis 120, puis 220, en travaillant toujours dans le sens du grain. Après le ponçage, retirez toute la poussière, séchez complètement, puis huilez 3 à 4 fois comme si elle était neuve.
Touchez la surface. Elle doit être lisse, légèrement soyeuse et fraîche. Si elle est rugueuse, sèche ou granuleuse — ou si le bois paraît pâle ou gris — il est temps de l'huiler immédiatement.
Le bois se dessèche et a besoin d'être huilé immédiatement. Appliquez généreusement de l'huile minérale sur toutes les surfaces et répétez 2 à 3 fois au cours des 24 prochaines heures.
Le grain du bois s'est ouvert à cause de l'humidité ou du dessèchement. Poncez légèrement avec du papier de verre de grain 220 dans le sens du grain, enlevez la poussière, puis huilez complètement.
Causé par une absorption inégale de l'humidité. Huilez toutes les surfaces, y compris le dessous et les bords, et mettez-la debout pour qu'elle sèche uniformément.
La planche s'est gravement desséchée. Huilez immédiatement et à plusieurs reprises. Les fentes profondes traversant la planche indiquent généralement qu'un remplacement est nécessaire.
Frottez avec du gros sel et du citron, puis rincez et séchez. Si la moisissure pénètre profondément, poncez jusqu'au bois propre, désinfectez, séchez et ré-huilez.
Les odeurs alimentaires ont été absorbées par le bois. Utilisez la méthode de frottage au gros sel et au citron, puis rincez, séchez et huilez. Répétez si nécessaire.
Utilisez ce calendrier comme guide pour les planches en bois massif et en bois composite. Les planches synthétiques ne nécessitent que l'étape après utilisation.
| Fréquence | Tâche | Remarques |
|---|---|---|
| Après chaque utilisation | Laver à l'eau froide et au savon doux. Sécher immédiatement. Mettre debout pour sécher les deux côtés à l'air libre. | Ne jamais faire tremper. Ne jamais mettre au lave-vaisselle. |
| Au besoin | Gommage au sel et au citron pour éliminer les odeurs alimentaires et les taches de surface. | Surtout après l'ail, le poisson et la viande crue. |
| Toutes les 3 à 4 semaines | Appliquer de l'huile minérale de qualité alimentaire sur toutes les surfaces. Répéter 2 à 3 fois si la planche semble sèche. | Plus fréquent dans les climats secs ou en période de chauffage hivernal. |
| Tous les 1 à 3 mois | Appliquer de la crème pour planches ou de la cire d'abeille sur toutes les surfaces. Polir pour finir. | Toujours huiler avant de cirer. |
| Tous les 6 à 12 mois | Inspecter les fissures, les taches et les coupures profondes. Poncer si nécessaire (grain 80 → 120 → 220). | Re-huiler et cirer après le ponçage comme si la planche était neuve. |
| Avant la première utilisation | Huiler les nouvelles planches 3 à 5 fois avant utilisation, avec plusieurs heures entre chaque application. | Essentiel pour les planches en bois massif – ne pas sauter cette étape. |
Laver à la main à l'eau froide · Jamais au lave-vaisselle · Ne jamais faire tremper · Sécher les deux côtés immédiatement · Huiler toutes les 3 à 4 semaines avec de l'huile minérale de qualité alimentaire · Cirer tous les 1 à 3 mois · Traiter les planches en bois massif sur les six surfaces de manière égale · Poncer et restaurer si nécessaire
Parcourez notre sélection de planches à découper Combekk de qualité supérieure – fabriquées avec précision en Hollande, exceptionnellement durables et conçues pour une utilisation sérieuse en cuisine.
Une planche à découper bien entretenue vous récompensera par des années – voire des décennies – de service de cuisine magnifique, sûr et fiable.
Ecrit par Online Support


Laisser un commentaire
Ce site est protégé par hCaptcha, et la Politique de confidentialité et les Conditions de service de hCaptcha s’appliquent.